Cernit texture plates Freestyle
Cernit texture plates
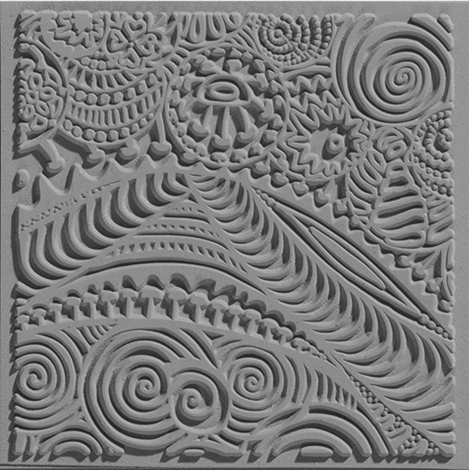
A wide range of patterns is possible with all our Cernit texture plates! Very easy to use yet with a complex result. This multiplies your possibilities of achievements especially for jewels and decorative objects!
More informations
More info
You will find in our Cernit product range 20 beautiful texture plates with various patterns to print your creations. 4 of them are unique models designed by Joe Patouille and Charlotte Lemoine, well-known and talented French polymerists!
From geometric motifs with Indian motifs to floral patterns, texture plates are popular among polymerists of allt ypes. Their use is so simple, yet the result so beautiful!
Why spend hours modelling a pattern while a pressure on your clay with the texture plate is enough to get a complex and detailed pattern?
How to use your Cernit texture plates ?
Several techniques are common to exploit the pattern of texture plates:
-
Impress of textures : for this technique, place the texture plate on the clay once it has been rolled or passed through the pasta machine. When positioned, press firmly on the stainless steel roller or with the palm of your hand as evenly as possible. Peel off the plate and see the pattern appear!
-
Sutton slice : Using small pieces of Cernit, fill the drawings with the plate. Then use the soft blade to remove the excess clay, in the same way that the excess is removed from a silicone mould. Do not use a rigid blade to avoid damaging your plate.
Once you have carefully removed the excess, place a sheet of Cernit against the plate. For a more beautiful effect, use a color that contrasts with the Cernit used to fill the patterns. Turn everything over, press firmly and evenly on the play so that both pastes adhere. Gently remove the plate making sure everything has well adhered.
The result you get is unique: the entire design of the plate is embossed! -
Mica shift : prepare your Glamour or Shiny clay by kneading it in your hand. It is essential to put your clay in the pasta machine twenty times, always in the same direction. Thus, all the glitter will be oriented in the same direction.
Place the texture plate on the clay and press firmly with your hand or with the stainless steel roller to embed each detail of the design into the clay.
Remove the texture plate.
Use a flexible Cernit blade to gradually remove the relief of the drawing and end up with a smooth paste. You will notice as you remove the relief, that the pattern is printed on the clay thanks to the work of the machine on the glitter.
To make the pattern stand out, pass the roller on the clay
For even easier release, you can put a little talc on your plate.
Useful information
They are based on vulcanized natural rubber which is obtained from latex. For people having a latex allergy, the use of these structural plates is not recommended.
The texture plates are 9 cm squares. To clean them up, just use a little water and soap.
Why should you buy the Cernit texture plates ?
-
The Leur facilité d’utilisation et le nombre de possibilités les rend incontournables
-
The detailed patterns provide a beautiful and complex result
-
Due to they flexibility, unmoulding is easy !
If you require further information on this product, please do not hesitate to contact our team to the following phone number : +32 4 362 19 90 or via e-mail : info@clay-and-paint.com
Customers who bought this product also bought:
Articles du blog en relation
Reviews
You must log in to give a review
The Clay & Paint Factory | VAT 0668.484.210 | Legal Notice & Contact
General Conditions
This internet site uses cookies to improve the users experience. Terms of use of website and protection of personal data.
© Copyright 2025 - E-net Business, creator of e-commerce websites for businesses, self-employed, & SMB
